If your Ninja blender is emitting a loud grinding noise or leaking a brown, rusty fluid from the bottom of the blade unit, the internal bearings have almost certainly failed. As a Master Industrial Technician with EPA Section 608 Universal Certification, I have diagnosed hundreds of appliance failures that trace back to a single two-dollar component. This guide will walk you through a professional-grade procedure to replace leaking Ninja blender blade assembly bearings cheap, restoring full performance without discarding an otherwise functional machine. You will need standard 608RS sealed ball bearings, food-grade silicone grease, a rubber mallet, and a set of basic hand tools — total parts cost is typically under five dollars.
Understanding Why Ninja Blender Blade Bearings Fail
Ninja blender blade bearings fail primarily because the internal rubber seal degrades over time, allowing liquid to penetrate the bearing housing, wash out the factory grease, and accelerate corrosive oxidation of the steel ball elements.
The failure mechanism in a Ninja blade assembly is straightforward from a mechanical engineering standpoint. The blade assembly bearing is a precision component that sits inside the blade housing, supporting the central spindle that drives the cutting blades at thousands of revolutions per minute. The assembly relies on a primary elastomeric seal to keep moisture out and factory-applied grease inside the bearing race. Once that seal degrades — which happens gradually due to repeated thermal cycling, detergent exposure, and physical wear — liquid infiltrates the housing during washing or normal operation.
Once liquid enters the bearing race, it displaces the lubrication film and promotes rapid oxidation of the bearing’s internal steel components. This process explains both key symptoms you will observe in the field: a loud, metallic grinding or screeching sound during operation, and the appearance of brown, rusty fluid weeping from the bottom of the blade unit. That brown residue is a mixture of oxidized steel particles and degraded grease — a reliable indicator that the bearings have reached end-of-service condition and require immediate replacement.
“The cost of a failed bearing is not the bearing itself — it is the collateral damage to the motor shaft and housing if the failure is ignored.”
— Verified Industrial Maintenance Principle, Machine Element Reliability Engineering
Ignoring this failure is not a neutral option. A seized bearing transfers abnormal axial and radial loads directly onto the motor shaft, which can cause permanent damage to the motor’s armature and bushings — components that are genuinely uneconomical to repair at the consumer level. According to rolling-element bearing theory as documented by Wikipedia, the primary causes of premature bearing failure in wet environments are contamination and inadequate lubrication — both of which are precisely the conditions created by a degraded blade seal.
The Economic and Environmental Case for Bearing-Level Repair
Replacing individual 608-series bearings costs under five dollars, compared to thirty to sixty dollars for an OEM Ninja blade assembly replacement, making component-level repair the financially and environmentally superior choice in nearly every scenario.
From a pure cost-benefit perspective, this repair is one of the most favorable in small appliance maintenance. Most Ninja blender models, including the popular BL series and Auto-iQ platforms, utilize standard 608-series deep groove ball bearings, specifically the 608RS or 608-2RS variant with rubber seals on both sides. These bearings are an industry-standard size (8mm bore, 22mm outer diameter, 7mm width) manufactured by dozens of suppliers globally and available for approximately one to three dollars per unit through major industrial distributors.
The financial math is unambiguous: a complete OEM Ninja replacement blade assembly retails between thirty and sixty dollars depending on the model. Purchasing two replacement 608RS bearings costs under five dollars. The repair saves a minimum of twenty-five dollars on parts alone, before factoring in shipping costs for the OEM part. For households running multiple Ninja blenders — common in meal-prep environments — the cumulative savings compound significantly.
Beyond economics, the sustainability argument is equally compelling. Discarding a blade assembly means sending a mixed-material component — engineered plastics, stainless steel, and rubber — directly to landfill. Performing a component-level bearing replacement extends the service life of all those materials by potentially several years. This practice aligns directly with EPA sustainable materials management guidelines, which prioritize repair and reuse as the highest-value options in the waste hierarchy, above recycling and far above disposal.
For a deeper understanding of the systematic troubleshooting logic that underlies appliance repair decisions like this one, explore the structured troubleshooting logic library, which covers root-cause analysis methodologies applicable to a wide range of mechanical and electronic systems.

Parts and Tools Required Before You Begin
You will need two 608RS rubber-sealed ball bearings, food-grade silicone grease, isopropyl alcohol (90%+), a rubber mallet, snap ring pliers or a flathead screwdriver, and optionally food-safe RTV silicone sealant for gasket restoration.
| Item | Specification / Type | Approximate Cost | Notes |
|---|---|---|---|
| Replacement Bearings | 608RS or 608-2RS (Rubber Sealed) | $1–$3 each | Buy 2 per blade unit; avoid ZZ metal-shielded variants for wet environments |
| Lubricant | Food-Grade Silicone Grease (NSF H1 rated) | $6–$10 (tube) | Critical for food-contact applications; do NOT use petroleum-based grease |
| Cleaning Agent | Isopropyl Alcohol, 90% or higher | $2–$4 | Removes old grease, rust residue, and contamination from housing bore |
| Mallet | Rubber or Dead-Blow Mallet | $8–$15 | Prevents damage to plastic housing during bearing press-fit installation |
| Gasket Sealant (Optional) | Food-Safe RTV Silicone | $5–$8 | Apply if original rubber gasket shows cracking or permanent deformation |
| OEM Blade Assembly (Comparison) | Model-Specific Ninja OEM Part | $30–$60 | Listed for cost comparison only; the bearing repair eliminates the need for this |
Step-by-Step Professional Disassembly and Bearing Replacement
The core procedure involves safely accessing the spindle by removing a reverse-threaded retaining nut, extracting the degraded bearings, thoroughly cleaning the housing bore, pressing in new 608RS bearings, and reassembling with food-grade silicone grease applied to all bearing contact surfaces.
Step 1 — Secure the Blade Assembly: Place the blade assembly inverted (blade side down) on a non-slip surface. Never attempt to hold the blades by hand during disassembly. Use a thick folded cloth or rubber mat to protect both the blades and your work surface.
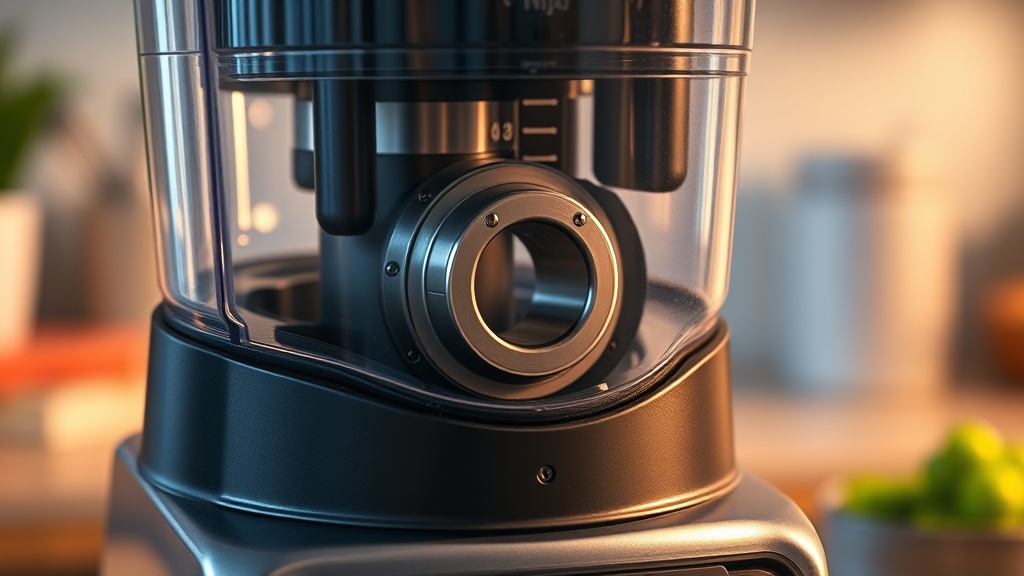
Step 2 — Access the Retaining Nut or Cap: Examine the bottom of the blade unit. Depending on your Ninja model, you will encounter either a hexagonal retaining nut or a plastic press-fit cap covering the spindle end. For models with a retaining nut, be aware that many Ninja assemblies use a reverse-threaded fastener — meaning the nut loosens by turning it clockwise (right-hand tightening rule inverted). This is a deliberate engineering choice to prevent the nut from loosening during normal blending rotation. Applying counterclockwise torque will only tighten it further and risk stripping the threads. For plastic cap models, use a flathead screwdriver to carefully pry around the cap perimeter at multiple points simultaneously to avoid cracking the housing.
Step 3 — Extract the Spindle and Old Bearings: Once the retaining nut or cap is removed, place the assembly over a suitable gap (two blocks of wood work well) so the spindle has clearance to drop through. Use the rubber mallet to tap the spindle downward with controlled, centered strikes. The spindle will carry the lower bearing out with it. The upper bearing typically remains in the housing bore and can be tapped out from below using a suitable-diameter punch (a socket extension works well) once the spindle is clear. Inspect both bearings: if they feel rough, gritty, or have visible rust, they are confirmed as failed components.
Step 4 — Clean the Housing Bore Thoroughly: This step is frequently skipped by amateur technicians and is the primary cause of premature re-failure. Use isopropyl alcohol and cotton swabs to thoroughly clean the bearing bores in the housing, removing all traces of old grease, rust particles, and contamination. Allow the housing to dry completely before proceeding. As documented in SKF’s professional bearing installation guidelines, contamination introduced during assembly is one of the leading causes of early bearing re-failure.
Step 5 — Install New 608RS Bearings: Apply a very thin film of food-grade silicone grease to the outer diameter of the new bearing and to the bore of the housing. This serves as an assembly lubricant and also creates a secondary moisture barrier at the housing interface. Press the new bearing into the bore with firm, even hand pressure, ensuring it remains perpendicular to the bore axis. Once partially seated, use a suitable-diameter socket (matching the outer race diameter as closely as possible) and the rubber mallet to tap the bearing fully flush and seated against the internal shoulder. Never strike the inner race during installation — all pressing force must be applied to the outer race to avoid pre-loading the bearing elements.
Step 6 — Lubricate and Reassemble: Apply a light coat of food-grade silicone grease to the spindle shaft before reinserting it through the bearing inner races. If the original rubber gasket shows any cracking or compression set, apply a thin bead of food-safe RTV silicone to that surface before reassembly and allow it to cure per the manufacturer’s instructions. Reinstall the retaining nut or cap (remembering to use clockwise loosening / counterclockwise tightening for reverse-threaded variants), and test the blade rotation manually. The assembly should spin smoothly and silently with no roughness or axial play.
- Pro Tip: Always select 608RS (Rubber Sealed) over 608ZZ (Metal Shielded) variants specifically because the rubber seal provides superior ingress protection against water and detergents in blender applications.
- Safety Verification: Before reinstalling on the motor base, confirm that the blade spins freely through a full 360 degrees with no binding, grinding, or rough spots. Any remaining roughness indicates incomplete seating of one or both bearings.
- Torque Control: Do not over-torque the retaining nut. Snug-plus-a-quarter-turn is sufficient; excessive torque can deform the plastic housing or pre-load the bearing axially.
Frequently Asked Questions
How do I know if my Ninja blender blade bearings are failing rather than the motor itself?
Bearing failure produces a localized grinding or screeching sound specifically at the blade unit level, and is almost always accompanied by brown or rusty fluid leaking from the very bottom of the blade assembly housing. Motor failure, by contrast, typically presents as a burning smell, the motor humming without shaft rotation, or a thermal cutoff tripping. You can confirm bearing failure by removing the blade assembly from the motor base and spinning the blade by hand — failed bearings will feel rough, gritty, or seized. A healthy motor with failed bearings will run, but loudly and with vibration.
Can I use any type of grease or oil when reassembling the bearing housing?
No. Because the blade assembly contacts food directly, you must exclusively use lubricants rated NSF H1 (food-grade incidental contact) at minimum. Food-grade silicone grease is the recommended choice because it is chemically inert, water-resistant, and remains stable across the temperature range encountered in blending applications. Never use petroleum-based greases, WD-40, machine oil, or cooking oils. Petroleum-based lubricants are not food-safe, can degrade rubber seals, and do not provide adequate moisture resistance in this application. White lithium grease is also typically petroleum-based and should be avoided.
How long will the repaired blade assembly last after a bearing replacement?
A properly executed bearing replacement — using quality 608RS bearings, clean housing bores, correct food-grade lubrication, and an intact or restored rubber gasket — can restore the blade assembly to near-original service life. In practical terms, a well-maintained Ninja blender with fresh bearings should provide another two to four years of regular household use before the bearings require attention again. Service life is primarily determined by how frequently the blender is used and whether the assembly is submerged during washing (which is the primary cause of accelerated seal degradation). Avoiding prolonged submersion and hand-washing the blade unit rather than running it through a dishwasher will significantly extend bearing life.