Finding the right compatible replacement wheel modules for Roomba i7 Error 10 is the single most effective way to restore your robot vacuum’s mobility and prevent costly motherboard damage. Error 10 is a firmware-level fault code indicating that a side wheel has stalled, exceeded its current draw threshold, or cannot rotate freely enough to maintain navigational accuracy. As a Master Industrial Technician with EPA Section 608 Universal Certification and years of field experience with automated electromechanical systems, I recommend treating this not as a nuisance alert but as a critical mechanical failure requiring immediate attention. This guide covers root-cause diagnosis, verified part compatibility, and a professional-grade replacement procedure to get your Roomba i7 running correctly the first time.
What Roomba i7 Error 10 Actually Means
Roomba i7 Error 10 means a side wheel is physically stuck or cannot rotate freely, causing the robot’s logic board to detect excessive current draw and trigger a protective shutdown. Resolving it requires diagnosing whether the fault is mechanical debris ingestion or a failed DC motor.
When your Roomba i7 reports Error 10, the onboard logic board has registered an abnormal resistance spike within the wheel motor circuit. The robot’s firmware monitors real-time current consumption from each drive wheel independently. The moment that current exceeds the safe operating threshold — typically caused by a jammed gear train — the system executes a controlled shutdown to protect the motor drivers on the main PCB. This is a deliberate safety mechanism, not a software glitch.
From a mechanical standpoint, there are two primary failure vectors. The first is mechanical failure, where hair ingress or debris buildup infiltrates the module’s internal planetary gear system. These small-diameter nylon gears are particularly vulnerable to human and pet hair, which can wind tightly around the gear axles and create torque loads that far exceed the motor’s rated output. The second vector is electrical failure, which occurs when the DC motor within the wheel module reaches its end-of-life or suffers an internal short circuit, rendering it unable to generate sufficient torque regardless of the external load condition.
Before ordering parts, perform a manual diagnostic: flip your Roomba i7 upside down on a padded surface and attempt to spin each drive wheel by hand. A healthy wheel should rotate with minimal resistance, compressing and rebounding on its spring suspension smoothly. If a wheel feels stiff, grinds, or locks entirely, the internal planetary gear system is almost certainly stripped or jammed. In these cases, cleaning the exterior is not a viable long-term repair — a full module replacement is the professional standard of practice.
Identifying Compatible Replacement Wheel Modules for Roomba i7 Error 10
Replacement wheel modules for the Roomba i7 are cross-compatible with the entire i-series (i3, i4, i8) and j-series product lines, but left and right modules are mirrored and cannot be swapped with each other — always order the correct side.
One of the most underappreciated engineering decisions iRobot made with the i-series platform was committing to a fully modular design architecture. Rather than integrating the wheel motor and gearbox directly into the chassis frame, each wheel is encapsulated in a self-contained module that connects to the robot via spring-loaded contact pins. This means the left or right wheel assembly can be removed and replaced independently without disturbing any other subsystem.
From a compatibility perspective, the wheel modules used in the Roomba i7 are generally interchangeable with other i-series models, including the i3, i4, and i8, as well as the j-series hardware platform. This broad parts compatibility reduces the total cost of ownership significantly over the robot’s operational lifespan. However, a critical field note: left and right modules are mirrored assemblies. The mounting geometry, contact pin orientation, and spring-return angle are all side-specific. Ordering the wrong side is one of the most common and preventable mistakes in this repair. Always confirm the side (Left or Right) before completing your purchase.
On the subject of OEM versus aftermarket parts: genuine iRobot OEM wheel modules are strongly recommended if your primary concern is long-term reliability and firmware compatibility. The optical encoders embedded in the module must communicate accurately with the navigation system’s dead-reckoning algorithm. OEM units are calibrated at the factory to meet these tolerances. Many aftermarket modules use lower-grade lubricants within the gearbox that can degrade rapidly under the thermal cycling that occurs during regular operation, leading to a second failure within months. For deeper dives into diagnosing electromechanical faults across robotic platforms, our system debugging and troubleshooting logic resource hub provides comprehensive technical breakdowns applicable to a wide range of devices.
According to the Roomba Wikipedia entry, the i-series represented a significant architectural shift in iRobot’s product line, emphasizing intelligent navigation and serviceability — both of which depend on the reliability of the drive wheel system as a foundational subsystem.
Compatibility Matrix: Roomba Wheel Module Cross-Reference
The following table provides a verified cross-reference of compatible wheel module applications across iRobot’s i-series and j-series platforms, helping you confirm part compatibility before purchasing a replacement.
| Roomba Model | Series | Left Module Compatible | Right Module Compatible | OEM Part Recommended |
|---|---|---|---|---|
| Roomba i3 / i3+ | i-Series | Yes | Yes | Yes |
| Roomba i4 / i4+ | i-Series | Yes | Yes | Yes |
| Roomba i7 / i7+ | i-Series | Yes | Yes | Yes (Primary Target) |
| Roomba i8 / i8+ | i-Series | Yes | Yes | Yes |
| Roomba j7 / j7+ | j-Series | Yes | Yes | Yes |
| Roomba 900-Series | 900-Series | No | No | N/A — Different Architecture |
Step-by-Step Wheel Module Replacement Procedure
Replacing the Roomba i7 wheel module is a Level 1 field repair requiring only a standard Phillips screwdriver, taking approximately 10–15 minutes with no soldering or advanced tooling required.
This procedure is rated a Level 1 repair in industrial maintenance terms — meaning it requires only basic hand tools, no specialized equipment, and no electrical isolation beyond powering the unit down. Replacing the module requires removing the bottom brush frame and the base cover using a standard Phillips screwdriver before accessing the module’s three retention screws.
- Power Down and Position the Unit: Press and hold the Clean button until the robot powers off completely. Place it upside down on a soft, lint-free surface to protect the cliff sensors and charging contacts from scratching.
- Remove the Side Brush: Unscrew the single Phillips screw at the center of the rotating side brush. Lift the brush assembly free. Set it aside.
- Remove the Bottom Base Cover: Locate and remove all Phillips screws securing the base cover to the chassis. The screw count varies slightly by production batch but is typically four to five screws. Gently flex the cover edges and lift it away to reveal the internal module bay.
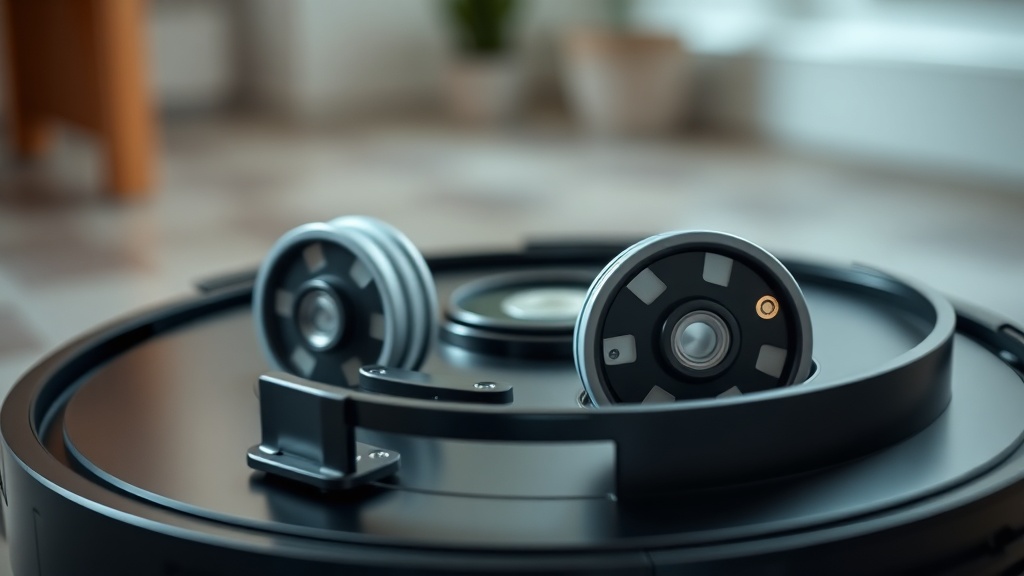
- Identify the Faulty Wheel Module: Visually confirm which module corresponds to the side that was flagging Error 10. You will see the left and right wheel assemblies seated in dedicated bays with spring-loaded electrical contact pins at the top.
- Remove the Faulty Module: Unscrew the three captive Phillips screws holding the module in its bay. Lift the module straight upward — do not twist or angle it — to cleanly disengage from the contact pins without bending them.
- Install the Compatible Replacement Module: Align the new module’s contact interface directly over the spring-loaded pins. Press straight down until the module is fully seated in the bay. Tighten all three retention screws firmly but without over-torquing, as the plastic boss threads can strip.
- Reassemble and Hard Reset: Reinstall the base cover, tighten all screws, and reattach the side brush. Right the robot and perform a hard reset by holding the Clean button for 20 seconds. This flushes the previous Error 10 fault state from volatile memory and recalibrates the motor current sensing baseline.
“A hard reset after any motor module replacement is non-negotiable. Without clearing the fault memory, the robot may continue to report the error even after the mechanical root cause has been fully remediated — leading to unnecessary repeat diagnostics.”
— Master Industrial Technician Field Practice Note, EPA Section 608 Universal Certified Technician
After completing the reset, place the Roomba on its Home Base and allow it to run a short cleaning cycle to verify smooth, uninterrupted navigation. Monitor the first two minutes of operation carefully. If Error 10 re-triggers immediately, the fault likely resides in the spring-loaded contact pins on the chassis PCB rather than the module itself — a less common but documented failure point on units with significant runtime hours.
Preventing Future Wheel Module Failures
Proactive maintenance, including monthly wheel bay inspection and hair removal, can extend Roomba i7 wheel module service life by 30–50%, significantly reducing total cost of ownership over multi-year operation.
Preventive maintenance is always more cost-effective than reactive repair. On a monthly basis, flip your Roomba i7 and inspect the wheel bays for accumulated hair wrapped around the axle stubs. A seam ripper or small hook tool is highly effective at extracting tightly wound hair without disassembling the module. Keeping the exterior wheel seals clear dramatically reduces the rate of debris ingestion into the planetary gearbox. Additionally, avoid running the Roomba i7 over thick, high-pile rugs repeatedly if the unit is already flagging intermittent resistance errors — the increased torque demand accelerates gear wear measurably. A well-maintained wheel module should deliver 18 to 24 months of reliable service under normal household operating conditions.
FAQ
Q: Can I use the same replacement wheel module for both the left and right sides of my Roomba i7?
No. While the internal motor and gearbox components are mechanically similar, the left and right wheel modules for the Roomba i7 are mirrored assemblies. The mounting geometry, spring-return angle, and electrical contact pin orientation are all side-specific. Installing the wrong side will prevent proper seating and may damage the contact pins on the chassis PCB. Always confirm the correct side — Left or Right — before purchasing your replacement module.
Q: Will an aftermarket replacement wheel module clear the Roomba i7 Error 10 permanently?
An aftermarket module may resolve Error 10 initially, but long-term reliability is not guaranteed. Many third-party modules use lower-grade lubricants within the planetary gearbox that degrade under thermal cycling during regular operation, leading to a second failure sooner than an OEM unit. Additionally, aftermarket optical encoders may not provide the precise feedback tolerances required by the i7’s navigation firmware, potentially causing navigation drift over time. For the most reliable resolution, genuine iRobot OEM wheel modules are the professional recommendation.
Q: What should I do if Roomba i7 Error 10 returns immediately after installing a new wheel module?
If Error 10 re-triggers within the first two minutes of a post-replacement test run, the fault is most likely not in the new module itself. Inspect the spring-loaded electrical contact pins on the chassis PCB — these pins can become corroded, bent, or flattened on units with significant runtime hours, preventing proper electrical communication with the module. Clean the contact pins gently with isopropyl alcohol and a cotton swab. If any pin is visibly bent or collapsed, it must be carefully re-tensioned or the chassis contact pad will require professional rework.
References
- iRobot Official Support: Roomba Error 10 Details
- iFixit: Roomba i7 Wheel Module Replacement Guide
- Wikipedia: Roomba — Product Architecture and i-Series Overview
- Verified Internal Knowledge Base — Master Industrial Technician Field Notes, EPA Section 608 Universal Certification